Friday, February 6, 2009

Flourless Chocolate Cake


Decadent and Delicious!


If you are anything like me winter gets old…….fast!
February can’t be over quick enough!
Living in the northeast we are programmed to pretend like we love the winter… like we planned it.
Skiing, Sledding, Hot Chocolate! Yeah!
Well, that only lasts so long. Some time in my mid twenties the reality sank in…..
Shoveling, School Cancellations, Heating Bills! Yeah!
Summoned to indoor projects I naturally turn to the kitchen. Thank God for the kitchen! The winter months are when I get acquainted with my oven. I have an open kitchen that sits in the center of my house, so when I start baking the oven doubles as a furnace….killing two birds here. Baking raises the temperature of my home by 3 degrees, no lie, I track this sort of thing… I told you winter makes me CRAZY.

Rather than sit and stew in my own seasonal pity-party, I seek out palatable pleasures beyond chicken soup. With Valentine’s Day acting as the official Hump Day of the Month; and all the good press around the subject; I focus on chocolate. Researchers have some news for chocolate lovers; it may be good for you. Who knew? Scientists reported preliminary evidence recently that cocoa and other chocolates may keep high blood pressure down, your blood flowing and your heart healthy. In addition, it will put a smile on your face!

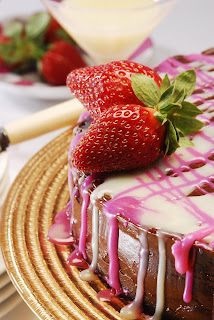
Here I present to you the Chocolate Trifecta.
Flourless Chocolate Cake with Chocolate Ganache and White Chocolate Drizzle.


You can find the Flourless chocolate cake recipe listed on my website www.powell-co.com Trust me, it's an easy recipe if you follow the directions. If you've never made a flourless cake don't try to improv here, stay to the recipe! The flourless chocolate cake is very nice on it's own with a scoop of vanilla ice cream and a dusting of powdered sugar. But we have winter blues to contend with.. that's when the ganache and white chocolate get involved. Her are the simple steps to bring these three decadent individuals together.


To make the Fourless Chocolate Cake visit my website, http://www.powell-co.com/, listed under 'recipes' you will find it. Bake the cake a day in advance. Let cake cool in the spring form pan, cover and store it in the fridge overnight. When ready to frost remove from springform pan and set cake on wax paper , wire rack or cake plate.


Prepare the Ganache
8 ounces (227 grams) semisweet or bittersweet chocolate chips
3/4 cup (180 ml) heavy whipping cream
2 tablespoons (28 grams) unsalted butter


Place the chocolate chips in a medium sized stainless steel bowl. Set aside. Heat the cream and butter in a medium sized saucepan over medium heat. Bring just to a boil. Immediately pour the boiling cream over the chocolate and allow to stand for 5 minutes. Stir with a whisk until smooth.

To frost the cake be sure cake is cold. Brush any loose crumbs from the cake and place cake on wax paper, wire rack or cake plate. (Put the wire rack on a baking sheet. In this way if the ganache drips it will end up on the baking sheet, which makes clean up easier). Using a cake spatula, cover the sides and top of the cake with about 2 tablespoons ganache. This is called a crumb coat and seals in any cake crumbs so that your cake will have a smooth finish. Refrigerate cake for 5 minutes to set the crumb coat. If you have any air bubbles or crumbs in your ganache, pour through a strainer. To cover cake, pour the remaining ganache into the center of the cake. Working quickly, spread with a spatula, using big strokes to push the ganache over the sides of the cake, to create an even coating of ganache. If there are any bare spots on sides of cake, cover with leftover ganache. Refrigerate.

Prepare White Chocolate Ganache
Follow the ganache recipe, substituting the semisweet for white chocolate. When whisked and smooth, divide white chocolate drizzle into two batches. Add 1/2 teaspoon of pink food coloring gel to one batch (I am using a neon pink! I love it!) and whisk until coloring is even throughout. Fill a squirt bottle with the White chocolate. In one direction 'Drizzle' the white chocolate back and forth - or use the fork drizzle method by dunking a fork into the white chocolate ganache and drizzle over cake. Pop the cake back in the fridge to let it set a little. Using another squirt bottle or fork method, repeat the same 'drizzle' in the opposite direction. Place the cake back in the fridge for at least 30 minutes before decorating with strawberries or raspberries.

Tip: Work quickly with Ganache as it thickens as it cools. To revive your ganache into a smooth workable texture microwave in 15 second intervals to achieve desired consistency.

Photos by Ed Nute


Monday, December 15, 2008

Holiday Cookies


The Incredible Edible Gifts!
a little more about giving homemade happiness during the holiday season...
A tribute to Royal Icing
Check out these Chic Holiday Cookies...oolala...Might I say Sassy!!
I have to admit these cookies are getting a lot of attention around my house!
Isn't it amazing what a little royal icing and brightly colored nonpareils can do for a cookie
Although 'party favors' are not manditory, wouldn't you love to hand these out to holiday partiers? Also the perfect gift for teachers, neighbors and co-workers.
I have lovely memories of the holidays growing up.
Cookies played a big role.
My mother made what seemed like thousands of cookies throughout the month of December. Her repertoire consisted of 'nut rum balls' (which I sadly report I still don't have that recipe..arrrrrr) 'pecan sandies' 'chocolate chip' and an array of sugar cookies dusted with colored sugar. To my memory she never used Royal Icing...I was jealous of people who did! And I have to admit, up until this year I have been afraid of the whole idea of Royal Icing. This was the year to face the fear......and what a let down...Royal Icing is easy and fun!
I am now kicking myself for not finding out sooner.
Here are the results...and a few tips for those who are slightly skeptical

Chocolate Hazelnut Cookies

The Cookie. Choosing the cookie was easy. The December issue of gourmet magazine has a wonderful cookie review and recipes as their seasonal feature. The pictures are gorgeous and each recipe is inspiring. From this I pulled a couple of cookie recipes; Hazelnut Chocolate Cookies and Almond Brown Sugar. I stuck to my own sugar cookie recipe as it is always a winner. The trio make a perfect package for my iced delights.

I wanted to come up with my own original design so I looked for an icing recipes elsewhere. Having never made royal icing I felt it was important to consult her Majesty...Martha. I figure no one has the skinny on Royal Icing like Martha. Her recipe is simple and straight forward..no surprise there.

Royal Icing...as Martha would have it
Makes about 2 1/2 cups
2 large egg whites, or more to thin icing
4 cups sifted confectioners' sugar, or more to thicken icing
1 lemon, juiced

Beat the whites until stiff but not dry. Add sugar and lemon juice; beat for 1 minute more. If icing is too thick, add more egg whites; if it is too thin, add more sugar. The icing may be stored in an airtight container in the refrigerator for up to 3 days.

When you get the icing to your desired consistency separate it into smaller batches to add color to. Play around with food coloring. I went for a vintage
pastel pallet. I store the separate colors in small plasic containers with fitted lids. I found icing the cookies in stages was the way to go. It definately tied my kitchen up for a full day, but it was worth it, the results were over the top.
My step by step
  1. Make all your cookies in advance. Store them in airtaight containers until ready to ice. TIP: make sure your cookies have a golden brown edge. This will keep your cookies from going soft after you apply the Royal Icing.
  • Make your icing, separate and color. Store in airtight containers.
  • Lay your cookies out onto baking sheets or wire racks. Face side up, ready to ice.
  • Place icing in small pastry bag with a fine tip, or do what I did - I used disposable parchment patry bags found at the craft store, easy clean up and cheap! No fancy tips needed!
  • Layer your designs - allowing about 10 minutes between each application so the icing sets before applying a new color. Sprinkle on sugars before icing sets. TIP: If you are made the icing ahead of time it may go wet on you. whip with an electric mixer to fluff up the consistency.
  • Allow the iced cookies to dry for at least 8 hours in the open air. Don't worry that the cookies will go stale, there is enough moisture in the icing to keep that from happening...trust me!
  • Store cookies in an airtight container or place them directly into gift bags ready to hand out.
    1. dreaming of sugar plums yet?????

      Monday, December 8, 2008

      Moroccan Spice Blend

      Happy Holidays!!


      Last week I participated in the Dovetales Holiday Boutique Show. The Event was fabulous!! Held at the new Plymouth Art Center, dozens of talented artisans came out to share thier creations with the public. I featured a Moroccan Spice Blend that has been evolving in my kitchen for years now.


      Thanks to everyone who bought one! They make great stocking stuffers for the Gourmet in your family.


      The blend is made up of ten exotic spices: Ginger, Cumin, black pepper, cinnimon, coriander, nutmeg, cayenne, paprika, garlic, clove


      The uses for Moroccan Spice Blend are endless... from couscous to tagine... from dry rubbing meat to roasting pecans!


      Hemming and hawing over the whole gift exchange?? If you are anything like me and everyone I know, this is NOT the year to being going all out on extravagant gifts. Financially we are all counting our pennies and enviromentally do we really need so much stuff??? I am pretty sure the Salvation Army can only handle so much of our unwanted things....


      So, how does the smart, savvy, slightly frugal gift giver manage?? Homemade gifts! That's right, like our granmother's used to do...only better! I've been doing this for quite some time now, and take it from me...it's fun, affordable and every one loves it!


      Here is my Moroccan Spiced Pecan Recipe to get you going.. plus you will need a really cute apron and classic holiday tunes to set the scene!

      Moroccan Spiced Pecans

      Makes 1 pound

      Ingredients:
      1 pound pecan halves
      1 tablespoons olive oil
      2 tablespoon butter - melted
      3 tablespoons brown sugar
      2 ½ tablespoons Powell & Company Moroccan Spice Blend
      1 teaspoon sea salt

      Preheat oven to 375 degrees
      In a mixing bowl gently toss pecans with olive oil. Spread pecans out evenly on a baking sheet. Bake for 5 minutes, giving them a toss at 2 ½ minutes.
      While the nuts are roasting, combine brown sugar, Moroccan spice mix and salt in a large bowl, set aside. Place melted butter in a medium bowl. Add hot pecans to the melted butter and gently mix.


      Move buttered nuts to the spice mix and toss; be sure to evenly coat the nuts
      Transfer coated nuts back to the baking sheet, spread evenly and roast for an addition 7-8 minutes, tossing once halfway through baking time.
      Let pecans cool on the baking sheet completely before storing in an airtight container.

      Moroccan Spiced Pecans are great for snacking, topping salads and cocktail hour!


      Check out my article in Dovetales Magazine for 6 great recipes and other great ways to create your own personalized gifts.


      Friday, August 29, 2008

      Quebec City


      Oh, Quebec...


      This august I found myself with my family in Quebec, what a city, if you have never been, GO! It is the closest thing to being in Europe without having to get on a plane...well you could take a plane, the car ride is really long....but the idea here is that within the North American Continent you CAN drive to Old Quebec a place where the people are friendly, the streets are clean and the beautiful french language is spoken all around you.


      The City is celebrating it's 400 anniversary so the place is action packed. The streets are alive with performers of all types...dancers, musicians and magicians. Action is literally everywhere. The restaurants are truly fantastic with endless options of where to eat.


      We stayed right at the port at Hotel Belley http://www.blogger.com/www.oricom.ca/belley, an adorable small boutique hotel with a very salty vintage style.... if you can imagine that. We arrive, check in and walked right out our door into a pedestrian wonderland. The city's walkability is amazing. We parked our car once and didn't use it until we left. With three days in the city and no reservations we had to get creative and assertive in our dining quest.

      While my husband and son checked out the street performers I window-shopped all the restaurants, grabbing menus and speaking with friendly hosts. I quickly found that a good meal is easily found, and you don't have to look far for a great meal, although you do need reservations at Saint Amour!

      Our plan was to go casual pretty much across the board and chose mostly bistro style restaurants offering outdoor seating, vegetarian fare for my son, a good burger for my husband, and something inspiring for me!


      'le lapin saute' at 52 Petit Champlain offered all of that! The burger came with hand cut fries you dip in homemade mayonnaise; the Pasta Prima Vera offers FRESH PASTA with thin ribbons of zucchini, roasted peppers and feta in a garlicky butter sauce that is surprisingly light; and the smoked salmon is done PERFECTLY on this aromatic hard wood plank.
      We sat under a canopy on a slate patio, which I noticed was heated for cooler nights!


      After our lovely meal we visited many of the galleries located in the petit champlain quarters. Here at galerie d'art du Petit Champlain we met Philip. World's greatest art salesman. I overheard a costumer tell him he could sell Santa the Elves. I thought that was cute. Almost as cute at Philip. www.gapc.ca

      Thursday, August 28, 2008

      Oh, Sunset Lake


      My wonderful sister Kelly has a quaint little cottage on Sunset Lake, New Hampshire. Nestled in rural Greenfield, Sunset Lake has become the official headquarters of Girls Weekend.

      Girls Weekend has become a tradition, and we try to have as many as the summer (and Bob and Chris, our husband's) will allow us. With warm mountain breezes and a sunny dock calling our names it is easy to drift off into total relaxation, which we do plenty of. But the reality of it is we can't relax, not until we've cooked a feast. Kelly and I are Gourmet Heavyweights and Girls Weekend is when the gloves come off! We pack the back of her wagon with the most unbelievable culinary ingredients available to mankind and head north. Kelly also makes sure we have plenty of top notch white wine to sip during our grandiose gourmet preparations, luscious red with dinner and Patron for pre-preparation margaritas.
      Okay, admit it, you wish Kelly was your sister.
      Menus are always mapped out before we head North. We plan everything but the produce. Rosaly's Organic Farm will dictate our veggies....


      And our Flowers....


      Gotta love Rosaly's


      Dinner this Evening will be Moroccan Chicken with Dried Apricots and Olives, Roasted Beets, Sauteed Zucchini and Minted Cous Cous (recipes to be posted soon on my website!)


      We used Bone in Chicken Thighs for our Moroccan Delight. I like to use the darker thigh meat in ethnic dishes with lots going on. The flavor of dark meat is richer and gamier than white meat. It doesn't get lost in the mix of heavy spices, sweet apricots and tangy olives used in this dish. It's important to allow the chicken to marinade for several hours.


      Get your grill going! We use an old school Weber with lots of hot coals, but a preheated piping hot gas grill works just as good.

      When our coals are hot we preheat the oven to 350 degrees. The chicken is grilled for 3 minutes on each side, just to char and sear in all the flava-flav. The grilled chicken is then placed in a roasting pan or ceramic casserole dish. A beautiful saute of shallots, butter, garlic, dried apricots, olives and reserved marinade is added to the chicken, and the dish is covered. Bake for 30 minutes.

      Summers not over yet, and fall is the best time in the Monadnocks! There will be more Sunset tales to come!


      Friday, July 18, 2008

      48 Hour Film Project - Providence


      My Kitchen has been getting a work out this week! On top of creating a Maryland style crab cake for one of my frozen seafood clients, I donated delicious treats to Goldilocks Productions. They are participants in the 48 Film Project being held in Providence this weekend. The Goldilocks Productions team will be one of 12 teams participating for a chance to win a national competition and a chance to be in the LA Short Film Festival - but get this...Goldilocks is so cool ......THEY ARE ALREADY going to be in the LA film Festival with their killer short flick Third Date - check it out http://www.thirddatemovie.com/ . With that feather in their cap we KNOW they will nail it in Providence....especially with Delicious Powell & Company Treats to keep them going.


      At 7:00pm tonight each team will pick their genre, literally from a hat! They have know idea what they will get, so planning ahead is merely impossible. The goal is to be ready for anything and everything! A team of 15 - writers, editors, producers... - will work and write feverishly through the night. They meet the rest of the crew - actors, camera, wardrobe...you name it - at 6:00am tomorrow!!! They will do what ever it takes to produce something amazing...results must be turned in at 7:00pm on Sunday.

      My task is to keep the team of 15 going through the first night. A few variables will determine my menu.

      • It is hot - I mean wicked hot. Cold food is a must.

      • The crew will be grazing through the night... a little here at 10:00pm, a little there at 2:00am, and another little thing at 5:00am.......Small portions of finger friendly foods, check!

      • Transportation and Refrigeration are issues, so compact, easy to transport containers packed in a cooler is the only way to go when traveling from Marshfield to Providence in the trunk of a car!


      • 2 women have Celiac Disease so my menu selection is crucial.

      After careful deliberation I select my menu....and inspirational messages...for my friends over at Goldilocks Productions! I hope they enjoy eating it as much as I did preparing it!!!!


      Oriental Express
      Keep the motor running with a mouthful of vegetarian sushi and Shrimp Basil Spring Roll!!!
      Garlic Ginger Soy with rev up your engine and taste buds….. Celiac Friendly......no tummy aches on this set!

      Chicken Salad Rollups
      White meat chicken, sprinkles of dried cranberries and a hint of celery……crunchy baby romaine……soft flour tortilla…
      Take a break and Enjoy…… this sandwich will satisfy…….

      Little Italy Rollup
      Say Hello to my little friend……..
      Genoa Salami, Provolone Cheese, Kalamata Olives and Roasted Peppers..etc… Yo! that’s what I’m talking about!

      Late Night Jet Fuel
      Guaranteed to keep you awake and keep you going!
      Balance your caffeine intake with a couple of peanut butter dark chocolate delights…..a little help through the night…….

      Fresh Fruit Kebobs
      It’s important to eat right, especially with lack of sleep! Do your body good and grab one of these……… Your Mom would want you to…….

      Tropical Macadamia bars
      To help your creative thoughts……….just don’t let these treats sweep you away to a far away island, stay focused!!!!! You only have 48 hours!!!!!!!
      My Son Desmond and his girl friend Jessica will be joining the Goldilocks team tomorrow as volunteer production assistants. Their first task is to pick up food donated by Susannah Locketti - another generous foody in the hood - Pick up time is 6:00am! Looks like crew is will be well fed....the first step to great things


      Good Luck Goldilocks!!!!!!


      Thursday, July 10, 2008

      Pizza on the Grill

      One of the most common question I am ever asked is, "Do you ever get sick of cooking". The honest answer to that question is NO. I really don't! I do it everyday! All day! My friends think there might be something wrong with me. Is cooking really a daunting task for most?? Well, not me.


      For me cooking is a job requirement. Most of my days begin at the store picking up ingredients and props needed for the styling gig or product development task at hand. I am always searching for the perfect specimen. I carefully pick fruit and vegetables, hold each piece up to the light and examine in great length; hue, texture and perfection must all be present. This is just about when the produce guy looks at me the way my friends do and thinks "hmmm......., now that's what they mean by OCD". It's okay, I'm used to it.


      When I am not on a shoot most of my work is done from home. I am either developing recipes and products or I am testing a dish for a future shoot. It's a whirlwind of madness, but great fun for onlookers who get to eat the test runs. When my proverbial whistle blows I switch gears and turn my attention to dinner.


      It's all about Dinner in my house. It's the precious time I get with my family and usually a few stray teenagers, and is without a doubt my favorite meal to prepare. I never actually plan a dinner -unless it's a special occasion - I always work with what I have on hand, which can be anything depending on the sort of work week I have had.

      Take last night for example. It was about 90 degrees and humid so I was really looking to cook outdoors. With a quick survey of the cupboards and the lucky chance of having Fresh Mozzarella balls - the cute little 1/4 oz's - ripe succulent tomatoes, a jar of kalamata olives and heaps of fresh basil in my herb box - in an instant I know exactly what we are having! Grilled Pizza! I run to the store for fresh pizza dough - found in the bakery dept - and pick up some crisp, cold chardonnay for sipping!


      Grilled Pizza is very easy to make, the key is be sure all your ingredients - your mise en place - are in place and ready to go!


      • First stretch your dough out as thin as possible without tearing. I separate my dough into two balls for two smaller pizzas vs the one big one.
      • Get your grill nice and hot and scrape off any debris from your last cook out.

      • It is important that your grill be well oiled. An easy way to oil up your grill is by soaking a few folded paper towels in vegetable oil. Using metal tongs grip the oil soaked towels and rub evenly over the entire surface of the hot grill.

      • Carefully, while stretched to it's fullest, lay the dough over oiled grill. Reduce heat to medium high and shut the lid. Cook for 4-5 minutes checking periodically, dough should be browned on bottom and show awesome grill marks, but not charred.
      • Flip the dough over and begin to apply your toppings. Spread out 4 or 5 tablespoons of pizza sauce, a variety of your favorite cheeses and what ever you fancy on top. Shut the lid and cook for another 4-5 minutes, reducing heat if necessary. The bubbling cheese will let you know when it is done. If you like your pizza extra crispy lower the heat and leave it on a little longer.
      • That's it. Easy right? See cooking is fun!